 |
GUIDELINES FOR USING MICROCASE |
||||
| Navigational Menu
OVERVIEW OF STATISTICAL THINKING MICROCASE MICROCASE
|
These
instructions should work from any computer on campus hooked to the
student network, but they were worked out for the Palmer 20 lab, and the
only sure thing (besides death, taxes, and system crashes the day an
assignment is due) is that they should work there.
MicroCase works from a Windows platform.
Once you have gotten into and loaded MicroCase, you can use the HELP
option in the Windows Toolbar at the top of your screen to find
documentation for any of the MicroCase options.
If the Guidelines below or the HELP documentation do not
answer your question, please contact Margaret Duncombe. GETTING
TO MICROCASE (Until you are familiar with how to access and
move around in MicroCase, you can should keep this page and MicroCase
itself open to facilitate your moving back and forth. Clicking on
the __ button in the top right corner of this screen will minimize the
screen. To restore it, you click on the Explorer icon in the tool
bar at the bottom of the page.) 1.
Turn on the computer and log on using your user id and password;
make sure you=re logging on to the student domain; 2.
Click on START button (with flying windows) in lower left corner
of screen; 3.
From the START menu, click on PROGRAMS; 4.
From the PROGRAMS menu, click on STATISTICS; 5.
From the STATISTICS menu, click on MICROCASE 4.6 Microcase takes a few seconds to load, but you will see a copyright and license screen, so that you know you=ve successfully found and are loading MicroCase. Once MicroCase is open you will see the menu screen divided into two parts:
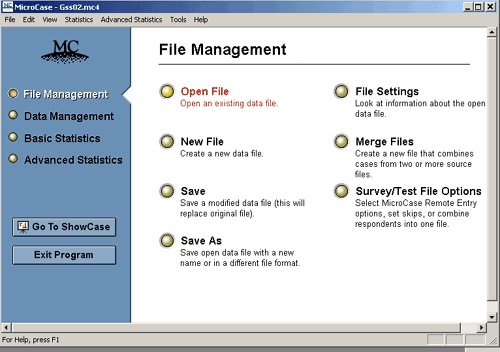
On the left is a blue box which contains four main menu options. MicroCase opens by default in the FILE MANAGEMENT menu because you must create or open a data file before you can do anything else with the program. When you are finished working with MicroCase be sure to click on the EXIT PROGRAM button. (Showcase is a presentation software which is not discussed on these web pages.) On the right is a white box with sub-menu options. The options displayed in the example above are the sub-options for the File Management Menu. (On other pages in this guide, the options on the Data Management menu and the Basic Statistics menu are discussed. See the navigational menu on the left of this page for hot links.) 1. Click on OPEN FILE; you should see an Open window superimposed on the MicroCase screen.
2.
When you are at the DATA folder which is the default OPEN FILE
window location, click on the ARCHIVES folder, and then click on OPEN;
within the ARCHIVE folder are four sub-folders:
Each
of the sub-folders also has several sub-folders; you can explore what=s available by clicking on a folder or a name and then
clicking OPEN to open it. Click
here for a list of all the data sets in the ARCHIVE. 3.
All data files are indicated by a DOC or a MC icon and a A.mc4"
ending. When you have
identified the data file you want to open, click on its name, which
should then appear in the FILE NAME box; then click on the OPEN box next
to the FILE NAME box. 4.
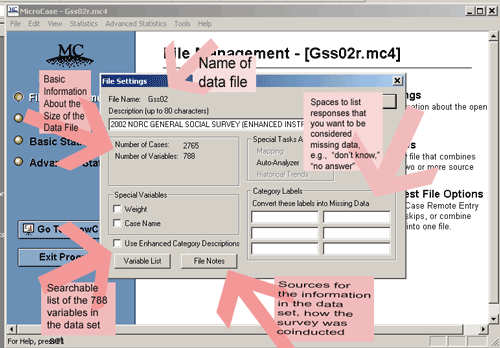
A new window entitled FILE SETTINGS will appear superimposed over
the MicroCase screen. This
screen tells you the number of cases (geo-political units, people
responding to the survey, or years for trend analysis) and the number of
variables. (Once you have
started your analysis, if you want to review this information, there is
a FILE SETTINGS option on the FILE MANAGEMENT menu.)
When you are through reviewing information about the data set or defining missing data, click on OK in the upper right corner. Note that the name of your data file is displayed in the taskbar next to the START button in the lower left of the screen as well as at the top of the screen. If you are working with several data sets in one session, you can always check this location to determine which one is currently open. |
||||
| for questions or comments contact me at mduncombe@coloradocollege.edu last updated on August 14, 2003 |

